Pages

Saturday, October 29, 2011

{ Sweet Sixteen meets Halloween }

Sweet Sixteen... aww...

We've all seen the movies, the birthday girl all dressed up like a princess or a movie star. Sweet and adorable decorations lined the tables and the room. Pinks & purples, and prettiness.

Precious right?

My niece's birthday party is tonight- and how sweet is it going to be?

NOT SWEET, that's how sweet.

Following in the footsteps of her older sister, she too, is having a Spooky Sixteen. Gross foods, disgusting decorations. It's all so.... special. mmmhmmm... That's my girls.

My laundry list of items included:

Caludron Cakes and Butterbeer
Blood Bites
Giant Bat Droppings
Licorice Wands
and the Pièce de grossness: Blood Clot Brain Cakes

Yeahhhhhhhhhhhhhhhhh.

You want more info?

Really?

REALLY?

m’ok, then.

p6
You can find the link to Caldron Cakes and Butterbeer here

p4

Blood Bites (aka Red Velvet Cake Balls) are here

p5

Giant Bat Droppings, well, these are simply a batch of brownies rolled into balls and dipped in chocolate. No need to add any icing or anything. I usually undercook my brownies so they are a LITTLE gooey, by about 3 minutes.

p3

Licorice Wands- Twizzlers dipped in chocolate with sprinkles

p2

and Blood Clot Brain Cakes. 

I found these on Pintrest a few months ago and pinned right away. 

Niecey was all excited about these. Have I mentioned she's pretty gross ;) A zombie loving, black wearing, gothic lolita obsessed girl. But, she's pretty cute, so I guess we'll keep her.

party

Find the original post here at Annie’s Eats

Other items on the menu:

"Man"wich (uh.. it's Manwich)
Frankenweenies (hot dogs)
Brains on Toast (our favorite appetizer that my mom makes, and yes, it's SO healthy ;)
Zombitables (veggies for the non-brain eating zombie)
Cheesy Toes (cheetos)
Crisped Critters (potato chips)
Swamp Goo (chip dip)
Cauldron Brew & Skin of Newt (Salsa and Chips)

and a few other disgusting things I can’t think of.

Or choose not to, take your pick.

Of course I made lil name tags too.
ScreenHunter_07 Oct. 29 15.48
Actually, I still have several of those to finish, and cut out, and fold…

I'd better do that now, or they'll set the wolves on me. No, seriously, these people are way into Halloween. 

They may have rented some.

Is the moon full tonight? Perhaps I should be a little worried about that.

uh...yeah, I gotta run!

Tina


Wednesday, October 26, 2011

{ Caramel Corn Deliciousness }


Mmmmmmmmmmmmmmmm………………..

Caramel Corn.

Right?

You know that’s right.


From fall through Christmas, caramel corn is one of my favorite treats.

It also makes great gifts. You can dress it up with nuts (if you are so inclined, which I am not) and drizzled chocolate too (I'm always so inclined to chocolate though).

Mmmm… If I do any of that this season, I’ll be sure to post it up.

Cause you wouldn’t want to miss that, would ya?

From the time I was young, my mom and I have made this caramel corn. She had a large roaster and we’d put 1/2 the corn in the bottom, and 1/2 in the top.

We’d spread the kitchen table in wax paper awaiting the finished product.

I could never resist taking a taste of it fresh out of the oven, still gooey.

And burn myself every time.

But not anymore. Because I’m a grown up and I know better.

*ahem*

Yeah.

This recipe is seriously easy. It just takes a little time to complete.

Here’s what you need:

Caramel Corn
1 cup butter
2 cups packed brown sugar
1 teaspoon salt
1/2 cup light corn syrup
1 teaspoon baking soda
7-8 quarts popped corn

Preheat oven to 200 degrees F.
CC2

Combine everything except the soda and popcorn in a pan, and heat over medium.

CC3

Bring to a boil

CC4

Boil for 5 minutes, then remove from heat. Add in the baking soda. 

I always enjoy how it fizzles up.

Stir well.

In greased baking pans (I use a roasting pan and 13x9 cake pan) pour mixture over the popped corn.

Now, many caramel corn purist will insist that you must use oil popped or air popped corn. I disagree. You CAN use microwaved popcorn. Normally, I would use a popper, but mine broke and I wasn’t buying a new one for this. Color me cheaps, but the Bean is currently a brace face, and shouldn’t be eating popcorn (which is his most favorite snack on God’s Green Earth), so, no new machine for us. I bought the 94% fat free microwave popcorn and popped it up. It was about 3.5 bags to get the right amount. Just try to pick out all the unpopped kernels first!

Worked splendiferously.
CC5

Now, slowly pour, stirring as you go.

Coat as evenly as possible.

Then, pop into oven. Stir every 15 minutes for one hour.

Turn out onto wax paper and let cool. If you have any large clumps, break when cooled and dry.

Store in airtight container or ziploc bags.

After that- the hard part begins.

You know, the part where you have to not eat your weight in it.

Good luck.

It’s not easy.

Trust me.

CC1


While I found this online by Paula Deen, this is the same recipe I’ve been using for as long as I can remember. 

My mom found it in one of those Church Cookbooks, you know the ones I mean. The ones where everyone sends in their favorite recipes.

No, I don’t remember who’s recipe it was, sorry. I’ll just say ‘thanks, Random Caramel Corn Lady, ‘preciate it’.


Tina

Monday, October 17, 2011

{ Caramel Apples }


So, how do you say it?

Care-a-mel? Or Car-mel?

I don’t care.
a-mel.
Get it?

Har. har.

I occasionally say care-a-mel, but then I feel too fancy for my pants. And we just can’t have that.

So, I snap back to normal and car-mel, actually it's more of a car-mull.

We could debate this for days.

But why would we?

Every year I made caramel apples.

You know the worst part?

Unwrapping the little buggers.

There has to be another way, right? Right.

Seriously, in the amount of time it takes you to unwrap the caramels, you can have this done.

This recipe is for 6 apples, but easily doubled.

Choosing the right apple is key.

You want one that is tart enough to balance the super sweet of the caramel. It also needs to be a firm apple.

Granny Smith is usually the best choice.

You will need a candy thermometer.

First melt the butter in a saucepan until it browns. This will give you the nice dark caramel color.

(My friend Darla of Bakingdom has a great step by step photo tutorial on browning butter.)

Add all other ingredients except vanilla. 

CA2

Over medium heat, bring to a boil, then let boil until thermometer reaches soft ball stage

Stir constantly, so it doesn’t stick or burn.

I realize when I took this picture I wasn’t stirring constantly like I just told you.

Uh… do as I say… not as I do. kay?

CA2-

After it reaches soft ball, remove from heat, add vanilla then allow to sit for about 5 minutes.

Dip apple in caramel.
CA4

Place onto buttered cookie sheet or parchment paper (you know how I love my parchment paper), and allow to cool.

CA3

Preeeeeeeetty, shinnnnnnnnny.

You can dip again into melted chocolate, or drizzle with melted chocolate & top with sprinkles.

CA1

Everybody loves caramel apples, don’t they??

I think so. I’ve often made these as gifts. I’ve dipped the melted chocolate in crushed cookies (oreos, chips, ahoy, nutter butters, grasshoppers, etc), crushed candy canes, crushed candy bars, etc.

Wrap them in cellophane paper, and top with ribbons and a tag. 

Great stuff.

This is a photo of one I did for presents for the Bean’s teachers a couple years ago.

Please forgive the quality, I could only find the websized photo. 

You guys are clever enough to get what it’s supposed to look like.

Apple

That is, IF you want to give them away.

And you know you don’t.

So, Care-a-mel
or
car-mel

or even, like me

car-mull.

Whatever floats your chewy, sticky boat.

Tina


Here's the printable!

If you haven’t already,  you can ‘like’ my Facebook page here, and follow me on twitter here, and you can follow me on instagram here.


Homemade Caramel Apples
6 Whole, washed and dried apples
6 sticks (popsicle sticks, lollipop sticks for smaller apples)
4 Tablespoons butter (butter, not margarine)
1/2 cup corn syrup
1/2 can of Sweetened Condensed Milk
1/2 cup white sugar
1/2 cup packed brown sugar
1 teaspoon vanilla extract

Choosing the right apple is key.

You want one that is tart enough to balance the super sweet of the caramel. It also needs to be a firm apple. Granny Smith is a great choice.

(This recipe is easily doubled)
First melt the butter in a saucepan until it browns. This will give you the nice dark caramel color. Stir constantly to avoid getting little brown bits of butter.

Add all other ingredients except vanilla.

Over medium heat, bring to a boil, then let boil until thermometer reaches soft ball stage (235°F–240°F).

Stir constantly, so it doesn’t stick or burn.

After it reaches soft ball, remove from heat, add vanilla, then allow to sit for about 5 minutes.

Dip apple in caramel and swirl to cover.

Place onto buttered cookie sheet or parchment paper.

You can dip again into melted chocolate, or drizzle with melted chocolate & top with sprinkles.


Sunday, October 16, 2011

{ Breakfast }

Here is what I made for breakfast today


Here is the recipe


You're welcome.


Tina


(stay tuned for a real recipe soon- involving caramel, lots and lots of caramel.)

Thursday, October 13, 2011

{ Warm Apple Pie Dessert Drink }

Dessert what?

Dessert drink.

That’s what I said.

This stuff tastes like spiced cider, but it also reminds you of a warm apple pie.
 

Yurm.

If fall had a flavor, this is what it would taste like.

This drink not only tastes delicious, it fills your house with a wonderful autumn smell.

Bonus!

Here’s what ya need:

Apple Pie Dessert Drink
4 Cups Apple Juice
1 Cup Water
1 Teaspoon Cinnamon
4 Teaspoons lemon juice
1 Teaspoon vanilla
2-4 Tablespoons packed brown sugar (depending on how sweet you like)
dash of nutmeg (ground)
dash of cloves (ground)
dash of ginger (ground)

Bring to a boil, then let simmer for about 10 minutes

Whipped cream
Caramel or Butterscotch ice cream topping

Pour into mugs and top whipped cream & drizzle with ice cream topping

Also wonderful without the whipped topping and ice cream topping. 

You could also add the ice cream topping into the mix, instead of topping with it.

Refrigerate leftovers, warm in microwave or stove top.

For parties, gatherings, and holidays, you can make this in the crock pot and keep it warm all day.

Also, I'm sure if you are so inclined (as I am not), you could splash a little booze in there, if that's your thing.

Cider

It’s yummy.

Seriously.

Wednesday, October 12, 2011

{ Pineapple Upside Down Cupcakes }

Our favorite show premieres tonight. We are so excited. 

We just love Psych!
Gus: You named your fake detective agency "Psych"? As in "gotcha"? Why didn't you just call it "Hey, we're fooling you and the police department; hope we don't make a mistake and somebody dies because of it."
Shawn: First of all, Gus, that name is entirely too long; it would never fit on the window. And secondly, the best way you convince people you're not lying to them is to tell them you are!
Wacky, witty, fun mystery solving always await us. With lots of fun 80’s references too! What’s not to love?

We’ve been awaiting the new adventures of Shawn and Gus for far too long now!

Normally a summer show, this year they pushed it back, not only to a fall premiere, but to a late fall premiere.

The nerve.

There is a pineapple game involved in each episode. The trick is to spot the pineapple. Just silly fun, but the pineapple is now an Psych icon.

Liz and I have known each other for nearly 8 years now. We often love the same shows. Psych is no exception.

She, jokingly, said that I should make Pineapple Upside Down Cupcakes for the occasion.

Hmmm…

Sounds like a great idea to me!

USCD3

Here’s what you need:
Yellow Cake Mix
eggs and oil called for on back of box
Can of pineapple tidbits (save juice)
Maraschino Cherries
1 to 1 1/2 Cups of light brown sugar
1 Stick of melted butter

Mix cake according to recipe, substituting the pineapple juice for the water in the recipe.

Grease the muffin pans well (you will NOT use cupcake liners* for this recipe)

*I do have a cupcake in a liner in the above photo- it was placed there after baking

Melt the butter

Spoon in a teaspoon or so of butter, then about a tablespoon of brown sugar.

Add cherry in the middle, and about 4 pineapple tidbits around it.

USDC2
Add cake batter.

Bake for 18-21 minutes until cake is done.

Allow to cool in pans for about 5 minutes, then invert onto cooling rack.

USCD3
All the joys of pineapple upside down cake (my 91 year old grandmother’s favorite cake!), in treat sized form.

Isss gooood.

Enjoy it while you are watching Psych. That is.. if you watch Psych.

And if you don’t…
you totally should.
Read up on it here, if you wish.

Oh, and check out my friend Liz’s blog too! Couponing, crafts, tips, mommying, and general life, Liz 2.0.

Tell her I sent ya!

Tina


Tuesday, October 11, 2011

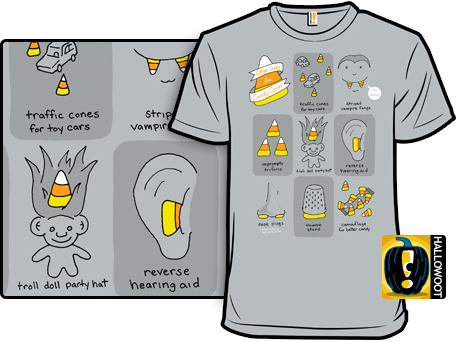
{ Oh, Candy Corn }

Woot, you and your candy corn are killing me.


This? 

Yeah, I'd use candy corn for all of these things before I'd put it in my belleh.

Other Uses for Candy Corn Shirt currently for sale at Woot Shirt

Let's be honest, we've all used that last trick.

You may now return to your regularly scheduled blogging.

Maybe.

Monday, October 10, 2011

{ Zombie Corn }

Funnily, enough, this is the name of a short story** by one of my favorite authors, John Green*

Well, technically, it's Zombicorn. But....

Anyway, for those of you who read my rant on Candy Corn in my Candy Corn Cupcakes post, you will know why this amuses me.

Zombie Candy Corn shirt currently available at Woot Shirt.

Candy Corn, it's definitely a love it or hate it candy.

Which are you? Lover or hater?

Tina- hater. period.


*by the way, if there are any other nerdfighters out there reading this... gimme a sign, or.. you know, a reply!

**you can download Zombicorns, if you, um... like zombie stuff, for free, but John asks that you not let it cloud your opinion of him as a writer, as he wrote very quickly for charity (The HPA). Watch John read the beginning here.

***yeah, ONLY read/watch if you like zombie things. I realize a lot of people DO NOT like zombies.. so.. don't read.. or watch. 

****making footnotes is fun.

Wednesday, October 5, 2011

{ Homemade Chicken & Noodles? Yes, please! }

Ahhhh... comfort food.

Who can't love that?

What is your favorite comfort food? 

Mine is a tie between mashed potatoes and these... homemade chicken and noodles.


If you are really evil, you'll put your noodles OVER the mashed potatoes.

Carb friendly? I think not.

My mom has been making these noodles for as long as I can remember. She used to make them every year for the county hospital bazaar. She would make and dry them, then bag to sell. In the week prior to the bazaar, we'd have noodles hanging on a rack on top of the dining room table for days. I used to like to help her break them. I don't know why, but it made me happy to snap them. (If there are any psychologists reading, please don't tell me what that says about me, kthanks). 

Once at the bazaar, they sure didn't last long. They were a hot seller.

You can feel free to make these and dry them. It will take a while longer for them to cook, once dried, however.

Actually, my  mom still makes them for a bazaar, just a different one. Now, she sells them cooked  at the Christmas Craft Bazaar in the food booth. She makes 2 roasters full, and never comes home with any. Nary a noodle left.

My, often BPIC and BFF (Baking Partner in Crime & Besty Friend Forevah), Lori, had to have surgery on her ankle, due to a car accident she was in a couple years ago, so we made some for her. And for us, and for some people at church.

Something like 16 recipes. Yes, we did. Oh, "we" is myself and my momma, of course.

Ok, I know I'm a real loser here, but I cannot find the card with the rest of the noodle photos on it.

So, pretend with me, please?

Bea's Homemade Noodles

What you'll need is:

Cooked and shredded chicken*

Chicken broth/stock*


1 Cup Flour

1 Egg

1/2 teaspoon salt

1/2 teaspoon chicken soup base (like McCormick- optional)*

2 Tablespoons milk


*if making Beef and Noodles, use beef broth/stock, and, you know.. beef instead of chicken.

Throw together in a mixer with a dough hook, or do it like mom does- in a food processor. You can also mix by hand, but ya gotta get in there, with your fingers. It will require a good bit of kneading to get it smooth enough.

It will be properly mixed when the dough forms a smooth ball in the mixer/processor.

Turn out onto a well floured surface, if the dough is still tacky, roll it around in the flour and knead a little. Then, roll out thinly. My mom rolls hers thinner than I do, but roll to your preference. 

(I just said 'roll' a lot).


Mom uses this funny little contraption to cut

(forgive the photo, I took it with my phone)

I cannot find one online to show you though. I did find these, which look quite nice, but I know absolutely  nothing about.


I, however, go old school. I like to roll up the dough, then cut with a knife. Then you have to unroll each noodle. Mom says I'm wasting time.

Probably right ;)

You can also use a pizza cutter either with the dough still flat out, or the dough rolled.

Always be generous with your flour!

You will want to cut these down shorter as well, unless you like long, spaghetti length noodles. If that's the case, you are golden.

As you cut, lay your noodles on a floured baking sheet. Dust and toss them as you add more. This will prevent clumping.

You can hang or lay your noodles to dry, but I prefer to drop right away and cook.

Drop a few at a time (to prevent clumping) into chicken stock (or beef if you want beef and noodles) when it is at a rolling boil. After you've dropped your noodles, reduce heat to low.

Cook for about 30 minutes, depending on thickness, until tender. If your noodles are super thin, they will cook much faster. Stir often.

Recipe feeds 2.
I love, love, love to make these with mom on Thanksgiving in the afternoon after everything else is already cleared. Turkey and noodles... yurm.
Here's another noodle recipe, it's basically the same, but a little more eggy. Also, his must be VERY thin, because mom's do not cook in 2 minutes!


They show you great step by step photos (which I failed at).

Here are all kinds of tips on making/cooking noodles.

Making noodles for the first time is kind of a learning process, but it's not hard. 

Just remember


Tina


Tuesday, October 4, 2011

{ Candy Corn Cupcakes }


Candy Corn Cupcakes… sorta.

CCCake1
Let me preface this by saying:
I. HATE. CANDY. CORN.
Please don’t throw it at me. Waxy sugar. Just not my thing.

However, I appreciate how pretty it is.
CCC
Preeeeeeeetty.

And how “fall” it feels. 

Fall is my favorite season. HUZZAH! for Fall.

(Sorry, I was recently at the Renaissance Festival and haven’t quite gotten it all out of my system. Be glad this recipe isn’t for Pottage & giant turkey legs)

I live in the country, so when the leaves start to fall, I love the smell of it. That’s weird, right? ‘Sok, weird is my normal.

I love the crisp air, the clear blue skies, the harvest taking place. I love hayrides and weenie roasts, pumpkin eating and pumpkin carving.

Huzzah for Fall!

What do you mean, I already said that?

Candy corn is pretty synonymous with my favorite season, so, I tolerate it. As a decoration.

I decided to make some cupcakes that LOOK like candy corn. NOT taste like. Look like.

You’ll need a white cake mix or recipe, orange food coloring (or yellow and red to make orange), and yellow food coloring.
Divide your batter out into bowls. You can do it evenly, or have the orange be a little larger, like in the corn itself.
Yellow, then orange, then white.
In this picture I’ve shown the progress.

Please don’t judge me for my cupcake pans. They are clean, I swears it.

cccb

Then, bake!
Let cool, and top with a buttercream icing. And.. if you must… a candy corn. 

Blergh.

That’s it! 

Pretty, right?

CCCake2

So, while these cupcakes LOOK like candy corn, they do not, thank Sweet Aunt Myrtle, taste like it.

CCCake4

 I don’t actually have a Sweet Aunt Myrtle, but if you do, thank her for me.