Search Sugar Bean Bakers

Showing posts with label Party idea. Show all posts

Tuesday, August 9, 2016

{ Simple Tangled Party }


This weekend I threw the girl's birthday party. As per usual, since she and Bean have been dating, the theme has been a surprise. The parties I've had for her in the past are: Mary Poppins, Disney World, and Beauty and the Beast. This year I went with one of her other favorite Disney movies: Tangled.

Since she turned 19, there are no party games involved, but still a lot of fun was had with the decor and food.

At the end of this post I will give a cost breakdown.

Here we go!

First off, this party begged to be held outside since that is where Rapunzel REALLY wanted to go!

Obviously, and most importantly, there are the floating lanterns. Now, I really wanted to get Wish Lanterns and have them, but 1. They are kinda spendy 2. They scare me 3. The ones I wanted (ecolanterns which fully decompose, no wires) would not be here in time. So, it just didn't happen. We did sparklers (see end of post). I made lanterns for decorations. I used a string of outdoor patio type lights. C9 Christmas lights would work too. I cut plain white printer paper into thirds and then added little Tangled suns that I cut with my Silhouette cutter.

Daylight:

Dusk:

Dark:

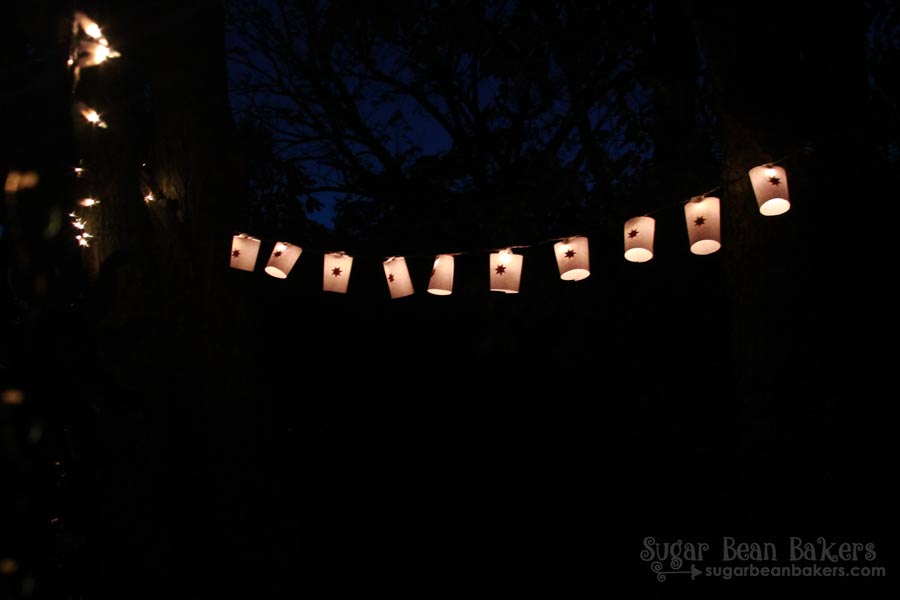
Simple, extremely inexpensive, and effective.

I added strings of plain white mini Christmas lights for extra pizzazz. I also moved two of my hanging plants out into the party area.

Daylight:

Dusk:

I hung gold wind spinners (they reminded me of braids) off the Christmas lights along with a Tangled sun looking windchime.


Bean cut pennants out of purple cardstock and then added suns that I cut with my Silhouette.


I added a pom pom garland as well.


I kept food simple since the party was set later after meal time. I made braids (re: Rapunzel's hair) from pizza dough & served with marinara. I also served braided pretzels. For her "cake" I made a brownie in a cast iron skillet. I served all the food in cast iron because of Rapunzel's skillet ;)


I threw in a few filled Twizzlers because they look like her hair.


For the table decorations, I bought a skein of yellow yarn and braided it. I added flowers in the braid like Rapunzel wears.

I also used a flower that I glittered, placed a color changing LED behind, and wrapped it with LED light up leaves. This was the 'Magic Flower'. Nearby was an LED butterfly.


Here is the Magic Flower at night.


Flynn's satchel with tiara were also used as decorations when not being worn by Flynn himself:


"Here comes the smolder..."

Bean and I made luminaries (to look like the floating lanterns) with white lunch sacks, suns cut with my Silhouette, sand, and tea lights. (He actually put the suns on the wrong side. The opposite side of the bags do not have seams. Don't tell him though, he's a good helper. ;) Just a little FYI if you plan to make some).

At dusk:

At dark:

Here is a look at the full set up


And in the dark:

Lights, wind spinners, luminaries, and floating lanterns in the dark:

There was also a lovely moon that night:

Finally, the sparklers, as I mentioned earlier.
(there were more guests, they had mostly left by now though).

Between the food and sparklers, everyone went inside and watched the movie.

It was a fun night & party. I hope I've given you a few ideas for hosting a Tangled party of your own!
For little ones you could do such things as hiding the tiara and sending them on a search for it. Playing pin the tongue on Pascal, and having a hair braiding contest with yarn.

Party Cost Breakdown:

Decorations:

Tablecloth (1): Dollar Tree- $1
Flowers for magic flower & Rapunzel's hair (3): Dollar Tree- $3
Pack of plates (1):  Dollar Tree- $1
Pack of napkins (1):  Dollar Tree- $1
LED leaves for Magic Flower  (1):  Dollar Tree- $1
Gold Spinners (2 in a pack) (2): Family Dollar- $2
Sun windchime (1): Family Dollar- $3
Tiara: (1):  Dollar Tree- $1
LED Butterfly (1):  Dollar Tree- $1
Pom Pom garland (1):  Dollar Tree- $1
Yard for hair (1): Walmart- $3
Colored Cardstock (1 package): Walmart $1 used (full pack $5)
Paper bags for luminaries (1): Walmart- $2
Total: $21

Food:
Breadsticks & Marinara: $6
Pretzels: $2.50
Brownie: $3
Twizzlers: $2
Lil Hugs (drinks): $2
Total: $15

Items on hand:
Color changing LED
Printer paper
Sparklers
Baker's twine (to made pennant banner)
satchel
Flynn Rider's Disneybound clothing
Silhouette Cutter
Cast iron skillets

Party total (8 guests): $36.50!

A party doesn't have to break the bank to be good :) Hope you enjoyed this post. See my other party plans here. I always try to host fun and budget friendly parties!


Wednesday, July 1, 2015

{ Oh The Places You'll Go Party }


I'm finally sharing Bean's graduation party!

I wish I could tell you that everything went off without a hitch and that I have beautiful photos to share with you, but that is not true.

After having not rained for weeks, the weather report was for, you guessed it, rain.

We went ahead and set up the tent and got things ready, but then, it started to rain. It was a few hours before the party though, so we thought it would be ok. Well, hubs was more convinced than I.

One and a half hours before the party, I decided it would be best to move the location from our backyard to our church.

A lot of scrambling to get things moved and set up took place in that amount of time. I arrived at the church less than one hour before the party began. Thanks to awesome friends who showed up to help, everything got set up.

It may have not been how I'd pictured his party, in our lushy green backyard with hot air balloons hanging from the trees, but this was the party that we had and Bean was still thrilled.

Also, I left my camera at home in the rush. Oops. These are all taken with my phone.

I found the poster decorations on Amazon.


These are what were supposed to hang from our trees. Instead they hung from the basketball hoop in our church gym. Oh well.

I found the tiny baskets on Amazon as well and tied them onto balloons.


For the food I had a Walking Taco bar.

Bags of Fritos and Doritos along with taco meat, salsa, nacho cheese, shredded cheeses, onion, sour cream, jalapenos, onion, and lettuce.


Multi colored Goldfish crackers became Fish in a Dish


Truffala Treats (make the same as Rice Krispy Treats but with Trix cereal instead)


Dipped Marshmallows and Pretzels in Seuss colors


And a Candy Bar


I went the day after Easter and snatched up all the pastel colored candy I could grab for this. The colors match perfectly and 50-75% off, heck yeah!

You can barely see them off to the side in this second photo, but I had fry boxes and crayon boxes for people to take their candy home in.

I have cotton candy in the large cookie jar, which was a huge hit, but be sure to put it in something with a lid and to make sure it gets put back on. It will quickly shrink and harden otherwise.

Lastly, the cupcakes.


These are made with my Cotton Candy Cream Cupcake recipe & my Chocolate Filled Cupcake Recipe (using Red Velvet instead of straight chocolate).

To make the swirled icing you will need 3 small icing bags, each filled 1/2 full with a different color. Snip a medium sized opening off of the bag. Insert the three bags into a large pastry bag fitted with a large tip. It will take a good bit of squeezing, but the result is lovely :)

For the guest book, everyone signed a copy of Oh The Places You'll Go, which I had already had gotten signed by his teachers K-12.

So, there you have it.

Not how we wanted it, but still a very happy grad party for my Bean.


Pictured here on his graduation night with my niece.

National Honor Society, Honor Thespian, and Honors Diploma Graduate. Momma Bear is proud

And will you succeed? 
Yes! You will, indeed! 
(98 and 3 / 4 percent guaranteed.) 
KID, YOU'LL MOVE MOUNTAINS

<3

Tina

Wednesday, February 4, 2015

{ Harry Potter Sorting Cupcakes }


Did you know that Feb. 5, 2015 is Worldwide Harry Potter Book Night?

Well, it is. You know what that means? It's time to pick up a book and dive back in. Go on, you know you want to. When is the last time you re-read your Potters? For me, it was 2 years ago. So, it is HIGH TIME I read them again.


One of the first and most exciting things that we experience at Hogwarts is the House Sorting. In my parties, I've done it two different ways. You can read about those here and here. For this idea though, I went a little sweeter. The idea came from my Zombie Party cupcakes.


It's just a cupcake of any flavor filled with a tinted cream filling. Tint your cream filling in the house colors: red for Gryffindor, blue for Ravenclaw, yellow for Hufflepuff, and green for Slytherin.

Squeeze a bit into your cupcakes, then top with a delicious buttercream. No one will be able to tell from the outside which is which. When you bite into them though...


It's a simple, but fun, and delicious way to get sorted into your House. Fun for a night of reading, watching, or a great way to sort into houses at a Harry Potter party!

If you are a seasoned Harry Potter fan, isn't it time you read them again? If you've never read them before: A. WHY NOT? and B. See what all the hype is about, pick up a book today!

It's been almost 18 years since the first Potter hit the shelves. Yet the  magic is still fresh no matter how many times we've read or seen them.

As Jo said herself:

“Whether you come back by page or by the big screen, Hogwarts will always be there to welcome you home.”


Thanks, Jo. <3

Tina


See these cupcakes featured at the world's largest Harry Potter site: Mugglenet.


Harry Potter Sorting Cupcakes
By Tina @ Sugar Bean Bakers

Needed:

24 cupcakes (any flavor/recipe)
1 recipe buttercream (below)
1 recipe cream filling (below)
red, blue, green, and yellow food coloring
4 piping bags and large tip

While your cupcakes are baking, make the following:

Cream Filling:
1/2 Cup Whole (Vitamin D) Milk (not 2%, 1%, or fat free)
3 Tablespoons Flour
1/2 teaspoon vanilla
1/2 Cup Butter (not margarine) barely room temp
1/2 Cup Granulated Sugar (NOT powdered sugar)

In a small saucepan, whisk flour into the milk until smooth. Heat, stirring constantly, until very thick, thicker than pudding. Remove and allow to cool fully. You can sit the pan in an icebath if you don’t want to wait.

In your mixer, beat butter and sugar together until fluffy. Add vanilla.

Once cool,  add the flour/milk/vanilla mix to the butter and sugar and beat until fluffy.

When finished, it will look like whipped cream, but be much thicker.

*Note- you can also shortcut this by just squeezing a bit of tinted Buttercream into the middle instead of the actual cream filling. 
Portion out into 4 bowls and tint one blue, one red, one green, and one yellow for the House colors.

Set aside.

After your cupcakes are cool, add your first color to a piping bag fitted with tip. Stick your tip down into your cupcake and squeeze. You will see the cupcake puff up a bit, that is how you know you have enough. If you add too much, your cupcake will crack open.

Repeat with the other colors. Scrap off any excess cream so the color will not show outside of the icing.

Whip up a batch of 

Vanilla Buttercream
1 cup unsalted butter, at room temperature
1 lb. confectioners’ sugar
1/4 teaspoon salt
2 to 3 tablespoons heavy cream
2 teaspoons vanilla extract


In a large bowl, or the bowl of a standing mixer, beat the butter for 3 minutes. Beat in the sugar and salt. Add 2 tablespoons heavy cream and whisk on high for 4 minutes, until fluffy. If frosting is too thick, add more cream, 1/2 teaspoon at a time, until desired consistency.

Stir in the vanilla.


Swirl on top of cupcakes taking care to cover any hints of the color below.

Add sprinkles if desired.


Wednesday, October 29, 2014

{ Mummy Munch Party Mix }


Hey, hey, hey, here's my Mummy Bones & Mini Mummy Cookies in action. Cute, no?

But, before we get to that, let me tell you a little story.

Last week, I awoke to a delicious smelling breakfast. It was all mapley and wonderful smelling. I thought, aw, my sweet Bean has gotten up and fixed breakfast! What an awesome guy! What a total champ! I drag myself out of bed and to the kitchen to find... I'm the only one awake. Whut?

Hubs was at work that weekend, but I knew it was definitely not anything lingering because the man eats Cheerios every day. Huh. Maybe I was dreaming in Smellovision.

The next day, I awoke to the same smell. This time, totally convinced nothing was going down in my kitchen, I was starting to worry for my Old Factory sense along with, hello, my brain.

The third day it happened, I was really becoming concerned. Should I consult WedMD for 'awaking to delicious smells'?  Probably not. That never ends well.

On the fourth day, I noticed something. A basket I'd recently placed not far from my side of the bed. A basket I'd removed from my closet for fear it would smell up Bean's tuxedo which was hanging just above where said basket used to sit.

A basket... full of Scentsy wax melts.

Bad news? No specially made, delicious breakfast for me.

Good news? My nose and brain are in tact.

Better news?

I have an awesome Halloween Snack Mix for you.


I really like making party mixes. I have a few here on the blog.

They are so easy to make, always a big hit, and can be dressed up for any occasion. This party mix requires a bit more time than most, having the Mummy Bones, and Mini Mummy Cookies. They are definitely a fun addition, but if you are in a time crunch, the mix is still totally delish without them.


You'll just need a few basic ingredients and you are off.

Serve it at your Halloween party, bag it up and give as treats or party favors, or enjoy on your own while gathering around the TV and watching It's the Great Pumpkin, Charlie Brown!

For more Halloween goodness you HAVE to go check out Darla's Mocha Cookies and Cream Cupcakes with Skull Cameos. They are AH-MAZE-ZING. Gorgeousness. You won't be sorry, so click on over to Bakingdom!

Happy Halloween!

Tina


Mummy Munch Party Mix
by Tina @ Sugar Bean Bakers

3 Cups Frosted Cheerios
3 Cups Rice Chex
3 Cups Popped Popcorn
1 Cup Mini Marshmallows
1 Cup Fall colored M&Ms
Fall sprinkles
6 blocks White Chocolate Almond Bark (or other white chocolate), melted
A few Mummy Bones (I only used about 12 for this mix)
A few Mini Mummy Head Cookies (I only used about 12 for this mix)

Line counter with parchment paper. Spread out cereal and popcorn. Pour white chocolate over. Allow to slightly cool, then toss with hands. Scatter sprinkles and M&Ms before chocolate is fully dried. Add marshmallows just before serving. Lay Mummy Bones & Mummy Head Cookies on top of the mix after you've put it into a bowl for serving. If packaging it up for party favors, add 1 mummy bone and 1 mini mummy head to each bag.

Store in airtight container.

Tuesday, October 28, 2014

{ Mini Mummy Cookies }


Mummy Madness 3.0! Here we go...

These lil guys are KEY-YOU-TAH, right? They are also A. SUPER easy, and 2. Delicious!

You can make these little guys from any mini cookie, but for mine I chose Mini Nutter Butters because yum.

After the cookies, all you need is white chocolate, an piping bag, and sugar eyes.


These guys are totally adorable just piled up in a bowl, bagged up as party favors, or for trick or treaters. Imagine them bagged together with the Mummy Bones and Mummy Donuts. Too much cute! Or... how about in this snack mix?


For now,

Mummy out.

Tina


Mini Mummy Cookies

Mini sandwich cookies (I used mini Nutter Butters)
Melted white chocolate (I prefer Almond Bark)
Sugar Eyes
Piping bag

Dunk cookies in white chocolate to cover. Tap to remove excess chocolate. Place on parchment paper to dry. Snip a tiny end off of a piping bag and fill with melted (but slightly cooled) white chocolate. Drizzle on cookies to give a mummy look. Add sugar eyes and let dry completely. When dry, break off excess chocolate drizzles from sides of cookies. Store in airtight container.

Sunday, October 26, 2014

{ Mummy Bones }


These little gems are quick, quick, quick and easy for a super fun spooky treat.

This is a three ingredient 'recipe'. You'll need pretzel sticks, mini marshmallows, and white chocolate (I use Almond Bark). Maybe a wee bit of oil to thin the chocolate. That's it.


This is a fun project to get the kids on. They can assemble the 'bones' while the adults handle the hot chocolate. These are great on their own, or in this snack mix. These would be great bagged up for Trick or Treaters, or as a party favor. Fun all around.


They taste yummy too, of course!

More mummy madness to come...

Tina


Mummy Bones

Pretzel Sticks
Mini Marshmallows
White chocolate (melted)

Assemble the bones by inserting a marshmallow onto each end of a pretzel stick. Coat with white chocolate. Allow to dry.

Store in airtight container.


LinkWithin

Related Posts Plugin for WordPress, Blogger...